
Generating a JavaServer Faces 2.x CRUD Application from a Database
(taken from https://netbeans.org/kb/docs/web/jsf20-crud.html)
In this tutorial, you will use the NetBeans IDE to create a web application that interacts with a back-end database. The application provides you with the ability to view and modify data contained in the database – otherwise referred to as CRUD (Create, Read, Update, Delete) functionality. The application that you will develop relies on the following technologies.
- JavaServer Faces (JSF) 2.x for front-end web pages, validation handling, and management of the request-response cycle.
- Java Persistence API (JPA) 2.0 using EclipseLink to generate entity classes from the database, and manage transactions. (EclipseLink is the reference implementation for JPA, and is the default persistence provider for the GlassFish server.)
- Enterprise JavaBeans (EJB) 3.1, which provides you with stateless EJBs that access the entity classes, and contain the business logic for the application.
The IDE provides two wizards which generate all of the code for the application. The first is the Entity Classes from Database wizard which enables you to generate entity classes from the provided database. After you create entity classes, you use the JSF Pages from Entity Classes wizard to create JSF managed beans and EJBs for the entity classes, as well as a set of Facelets pages to handle the views for entity class data.
Perform the following steps to create a database and connect to it from the IDE.
- Download books_db2.sql and extract the archive to your local system. When you extract the archive you will see the SQL scripts for creating and populating the database. The archive also has scripts for dropping tables.
- In the Services window, expand the Databases node, right-click the MySQL node and choose Start Server.
- Right-click the MySQL Server node and choose Create Database.
- Type books as the Database Name in the Create MySQL Database dialog. Click OK. A new node appears under the Databases node (jdbc:mysql://localhost:3306/books)
- Right-click the new node and choose Connect.
- Choose File > Open File from the main menu and navigate to the extracted file books_db2.sql. Click Open. The file automatically opens in the SQL editor.
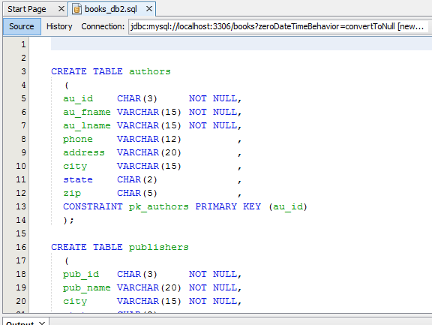
- Make sure that the books database is selected in the Connection drop-down list in the SQL editor toolbar, then click the Run SQL (
) button.
When you click Run SQL, the following output appears in the Output window.
Examining the Database Structure
To confirm that the tables were created correctly, expand the Tables node under the database connection node. You can expand a table node to see the table columns, indexes and any foreign keys. You can right-click a column and choose Properties to view additional information about the column.
Note: If you do not see any tables under the Tables node, right-click the Tables node and choose Refresh.
Looking at the structure of the books database, you can see that the database contains tables that have a variety of relationships and various field types. When creating entity classes from a database, the IDE automatically generates the appropriate code for the various field types.
The following table describes the tables found in the books database.
Database Table
Description
AUTHORS
The table authors describes the books’ authors. Each author has a unique identifier that’s the primary key.
PUBLISHERS
The table publishers describes the books’ publishers. Every publisher has a unique identifier that’s the primary key.
TITLES
The table titles describes the books. Every book has a unique identifier that’s the primary key. titles contains a foreign key,
pub_id, that references the table publishers to indicate a book’s publisher.
TITLE_AUTHORS
title_authors is the junction table that associates the tables authors and titles. title_id and au_id together form a composite primary key, and each column separately is a foreign key that references titles and authors, respectively. The non-key columns indicate the order of the author’s
name on the book’s cover (always 1 for a book with a sole author) and the fraction of total royalties that each author receives (always 1.0 for a book with a sole author).
ROYALTIES
The table royalties specifies the royalty rate paid to all the authors (not each author) of each book, including the total up-front advance against royalties paid to all authors
(again, not each author) of a book. The royalties primary key is title_id. The table royalties has a one-to-one relationship
with titles, so the royalties primary key also is a foreign key that references the titles primary key.
The books database includes a variety of relationships. When creating entity classes from a database, the IDE automatically generates the properties of the appropriate Java type based on the SQL type of the columns. The following table describes the entity relationships for the books database. (Inverse relationships are not shown.)
Entity
Related Entity
Relationship Information
Description
AUTHORS
TITLES
TITLE_AUTHORS
Authors and books have a many-to-many
relationship, because an author can write
multiple books and a book can have multiple
authors. title_authors is the junction table
that associates the tables authors and
titles
One AUTHOR writes one to many TITLE_AUTHORS.
One TITLE_AUTHOR is written by one and only one AUTHOR.
One TITLE writes one to many TITLE_AUTHORS.
One TITLE_AUTHOR is written by one and only one TITLE.
PUBLISHERS
TITLES
One-to-many
One PUBLISHER publishes one to many TITLES.
One TITLE is published by one and only one PUBLISHER.
TITLES
ROYALTIES
One-to-one
One TITLE pays one and only one ROYALTY.
One ROYALTY is paid to one and only one TITLE.
Now that the database is created, you can create the web application and use the Entity Classes from Database wizard to generate entity classes based on the database tables.
Creating the Web Application Project
In this exercise you create a web project and add the JavaServer Faces framework to the project. When you create the project, you will select JavaServer Faces in the Frameworks panel of the New Project wizard.
- Choose File > New Project (Ctrl-Shift-N; ⌘-Shift-N on Mac) from the main menu.
- Select Web Application from the Java Web category. Click Next.
- Type
Booksfor the project name and set the project location. Click Next. - Set the server to GlassFish and set the Java EE Version to Java EE 7 Web. Click Next.
- In the Frameworks panel, select the JavaServer Faces option. Click Finish.
When you click Finish, the IDE generates the web application project and opens index.xhtml in the editor.
Generating the Entity Classes from the Database
After connecting to a database in the IDE, you can use the Entity Classes from Database wizard to quickly generate entity classes based on the tables in the database. The IDE can generate entity classes for each table that you select, and can also generate any necessary entity classes for related tables.
- In the Projects window, right-click the
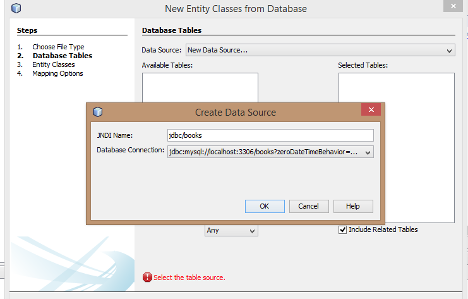
Booksproject node, and choose New > Entity Classes from Database. (If this option is not listed, choose Other. Then, in the File wizard, select the Persistence category, then Entity Classes from Database.) - Select New Data Source from the Data Source drop-down list to open the Create Data Source dialog.
- Type
jdbc/booksas the JNDI Name and select thejdbc:mysql://localhost:3306/booksconnection as the Database Connection.
- Click OK to close the dialog box and return to the wizard. The tables in the
booksdatabase appear in the Available Tables listbox.
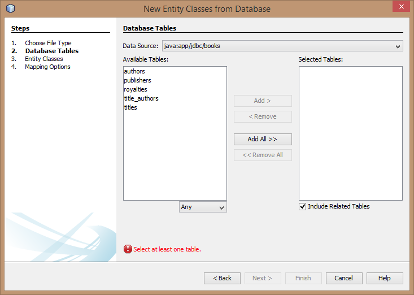
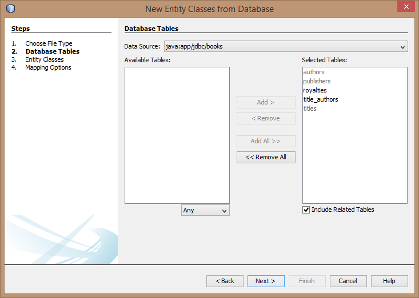
- Click the Add All button to select all tables contained in the database. Click Next.
- Type
jpa.entitiesas the Package name. - Confirm that the checkboxes to generate named queries and create a persistence unit are selected. Click Finish.
When you click Finish, the IDE generates the entity classes in the jpa.entities package of the project.
When using the wizard to create entity classes from a database, the IDE examines the relationships between database tables. In the Projects window, if you expand the jpa.entities package node, you can see that the IDE generated an entity class for each table. If a table is created solely as a junction table with no attributes of its own, the IDE will not create an entity class.
The IDE also generated an additional classes for the table with composite primary keys: TITLEAUTHORS. The primary key classes for this table (TITLEAUTHORSPK.java) has PK appended to the name.
If you look at the generated code for the entity classes you can see that the wizard added @GeneratedValue annotations to the auto-generated ID fields and @Basic(optional = "false") annotations to some of the fields in the entity classes. Based on the @Basic(optional = "false") annotations, the JSF Pages from Entity Classes wizard can generate code that includes checks to prevent non-nullable column violations for those fields.
Generating JSF Pages From Entity Classes
Now that the entity classes are created, you can create the web interface for displaying and modifying the data. You will use the JSF Pages from Entity Classes wizard to generate JavaServer Faces pages. The code generated by the wizard is based on persistence annotations contained in the entity classes.
For each entity class the wizard generates the following files.
- a stateless session bean that extends AbstractFacade.java
- a JSF session-scoped, managed bean
- a directory containing four Facelets files for CRUD capabilities (
Create.xhtml,Edit.xhtml,List.xhtml, andView.xhtml)
The wizard also generates the following files.
- the AbstractFacade.java class that contains the business logic for creation, retrieval, modification and removal of entity instances (The Facade design pattern allows programmers to create a simple interface for objects to use other objects)
- utility classes used by the JSF managed beans (
JsfUtil,PaginationHelper) - a properties bundle for localized messages, and a corresponding entry in the project’s Faces configuration file (A
faces-config.xmlfile is created if one does not already exist.) - auxiliary web files, including a default stylesheet for rendered components, and a Facelets template file
To generate the JSF pages:
- In the Projects window, right-click the project node and choose New > JSF Pages from Entity Classes to open the wizard. (If this option is not listed, choose Other. Then, in the File wizard, select the JavaServer Faces category, then JSF Pages from Entity Classes.)
The Available Entity Classes box lists the five entity classes contained in the project. The box does not list the embeddable class (TITLEAUTHORSPK.java).
- Click Add All to move all the classes to the Selected Entity Classes box.
- Click Next.
- In Step 3 of the wizard, Generate JSF Pages and Classes, type
jpa.sessionfor the JPA Session Bean Package. - Type
jsffor the JSF Classes Package. - Enter ‘
/resources/Bundle‘ into the Localization Bundle Name field. This will generate a package namedresourceswhich theBundle.propertiesfile will reside in. (If you leave this blank, the properties bundle will be created in the project’s default package.)
6. The Facelets template file is used by each of the four Facelets files for each entity class.
To let the IDE better accommodate your project conventions, you can customize any files generated by the wizard. Click the Customize Template link to modify the file templates used by the wizard.
In general, you can access and make changes to all templates maintained by the IDE using the Template Manager (Tools > Templates).
7. Click Finish. The IDE generates the stateless session beans in the jpa.session package, and the JSF session-scoped, managed beans in the jsf package. Each stateless session bean handles the operations for the corresponding entity class, including creating, editing, and destroying instances of the entity class via the Java Persistence API. Each JSF managed bean implements the javax.faces.convert.Converter interface and performs the work of converting instances of the corresponding entity class to String objects and vice versa. If you expand the Source Packages node you can see the session beans, JSF managed beans, utility classes, and properties bundle that the wizard generated.
If you expand the Web Pages node, you can see that the IDE generated a folder for each of the entity classes. Each folder contains the files Create.xhtml, Edit.xhtml, List.xhtml and View.xhtml. The IDE also modified the index.xhtml file by inserting links to each of the List.xhtml pages.
Expand the resources folder node to locate the default jsfcrud.css stylesheet that was generated by the wizard. If you open the application welcome page (index.xhtml) or the Facelets template file (template.xhtml) in the editor, you will see that it contains a reference to the stylesheet.
<h:outputStylesheet name="css/jsfcrud.css"/>
The wizard also generated a Faces Configuration file (faces-config.xml) in order to register the location of the properties bundle.
If you expand the Configuration Files node and open faces-config.xml in the XML editor, you can see that the following entry is included.
<application>
    <resource-bundle>
        <base-name>/resources/Bundle</base-name>
        <var>bundle</var>
    </resource-bundle>
</application>
Also, if you expand the new resources package, you’ll find the Bundle.properties file that contains messages for the client’s default language. The messages have been derived from the entity class properties.
To add a new property bundle, right-click the Bundle.properties file and choose Customize. The Customizer dialog enables you to add new locales to your application.
Exploring the Application
Now that your project contains entity classes, EJB session beans to control the entity classes, and a JSF-powered front-end to display and modify database, try running the project to see the results.
Examining the Completed Project
- To run the project, either right-click the project node in the Projects window and choose Run, or click the Run Project (
When the application’s welcome page displays, you are provided with a list of links enabling you to view entries contained in each database table.
The links were added to the welcome page (index.xhtml) when you completed the JSF Pages from Entity Classes wizard. They are provided as entry points into the Facelets pages that provide CRUD functionality on the Books database.
<h:head>
        <title>Facelet Title</title>
        <h:outputStylesheet name="css/jsfcrud.css"/>
    </h:head>
    <h:body>
        Hello from Facelets
        <br />
        <h:link outcome="/authors/List" value="Show All Authors Items"/>
        <br />
        <h:link outcome="/publishers/List" value="Show All Publishers Items"/>
        <br />
        <h:link outcome="/royalties/List" value="Show All Royalties Items"/>
        <br />
        <h:link outcome="/titleAuthors/List" value="Show All TitleAuthors Items"/>
        <br />
        <h:link outcome="/titles/List" value="Show All Titles Items"/>
    </h:body>
</html>
Click the 'Show All Authors Items' link. Looking at the code above, you can see that the target page is /authors/List.xhtml. (In JSF 2.x, the file extension is inferred due to implicit navigation.)
You can click the index link to return to the links listed in the welcome page. The links provide you with a view of the data held in each database table and trigger the List.xhtml file for each entity folder to display. As is later demonstrated, after you add data to the tables, other links will display for each entry enabling you to view (View.xhtml), edit (Edit.xhmtl), and destroy data for a single table record.